2. Markdown Snippets
SnippetsLab provides comprehensive support for Markdown. Activate these features by setting the language of your snippet to Markdown.
2.1. Preview
To toggle Markdown preview, you can:
Select Editor > Enable Markdown Preview in the menu bar.
Click the
 button in the toolbar.
Press Command-Shift-M.
To switch between full and side-by-side preview modes: Right-click (or click and hold) the
button in the toolbar and select your preferred mode from the dropdown menu.For dedicated control for each preview mode, right-click anywhere on the toolbar, select Customize Toolbar…, and drag the Preview Modes control into the toolbar.
Scroll sync. In side-by-side preview mode, SnippetsLab automatically synchronizes scrolling between the editor and preview panels. To make scroll sync one-way only or to disable it, adjust the Sync Scroll settings in the Editor menu in the menu bar.
Preview mode persistence. By default, the selected Markdown preview mode applies globally. However, SnippetsLab can also remember your chosen preview mode for each snippet, which is useful for distinguishing between “finalized” and “in-progress” work. To enable, open Settings > Markdown > Options, and select Remember the selected preview mode for each snippet.

2.2. Editing
Quick Format. Apply formatting with keyboard shortcuts or through the Format menu in the menu bar. For example:
Command-B for bold
Command-I for emphasize
Command-U for underline
Command-` for
Inline CodeOption-Command-1 to Option-Command-6 for headings level 1 to 6
Command-K to add hyperlinks
Additional Markdown elements such as images, tables, and footnotes are also available in the Format menu.
Inline rich text styles. For improved readability, SnippetsLab enhances Markdown source code with rich text styles in the main editor. If preferred, this can be disabled in Settings > Markdown > Options > Use in-editor rich text styles.
Line break handling. By default, SnippetsLab follows GitHub-flavored Markdown (GFM) or StackOverflow style where a single line break is parsed as a hard break. To adopt the CommonMark specification and treat a line break as a soft break, navigate to Settings > Markdown > Options and turn off Treat newlines as line breaks.
Smart symbols. To automatically convert ASCII symbols to HTML entity equivalents, navigate to Settings > Markdown > Options and enable Smart symbols. For more details, see SmartSymbols.
Tip
For quick access to common format options, add the “Format” button to the toolbar.
2.3. Code Blocks
Markdown includes full syntax highlighting support for code blocks. Specify a language alias with the fenced code block syntax as shown below for best results, but the app may guess the most likely language if not specified.
```ruby
def robot_invasion
   puts("robot " * 1000)
end
```
While both fenced and indented code blocks are supported, only fenced code blocks allow you to specify additional options, such as language alias.
To find the alias for a language: Right-click anywhere in the editor, and select the desired language from the Insert Markdown Code Block submenu. Note that only Active Languages are included in this menu.
To disable syntax highlighting, use the
textalias.To show line numbers, use the
linenumsoption to specify a starting line number—for example,linenums="1".```swift linenums="1" import foo import bar import baz ```
To highlight specific lines, use the
hl_linesoption. The value can be a single line number, a range of lines, or a combination of both separated by a single space—for example,hl_lines="1",hl_lines="1 3 5", andhl_lines="1 3-5".```swift hl_lines="2" import foo import bar import baz ```
To disable line-wrapping inside code blocks: Open Settings > Markdown > Options, and deselect Soft wrap code blocks.
To prevent the app from guessing a language: Open Settings > Markdown > Options and deselect Highlight code blocks without explicit languages.
2.4. Table of Contents
Include an interactive, auto-updating table of contents in the preview with the [TOC] marker. For best results, place it at the start of the snippet.
2.5. LaTeX/MathJax
Powered by MathJax, SnippetsLab supports rendering complex math formulas with high-quality typography. To write inline formulas, use $..$ as delimiters. To write block-level formulas, use $$..$$ as delimiters. Avoid spaces around the $ delimiters for correct rendering.
The **gamma function** is defined for all complex numbers except the non-positive integers. For any positive integer $n$, $\Gamma(n) = (n-1)!\quad$.

Derived by Daniel Bernoulli, for complex numbers with a positive real part, the gamma function is defined via a convergent improper integral:

$$\Gamma(z) = \int_0^\infty x^{z-1} e^{-x}\,dx, \ \qquad \Re(z) > 0\ .$$

The notation $\Gamma (z)$ is due to Legendre. If the real part of the complex number $z$ is strictly positive ($\Re (z)>0$), then the integral converges absolutely, and is known as the Euler integral of the second kind. Using integration by parts, one sees that:

$$
\begin{aligned}
   \Gamma(z+1) & = \int_0^\infty x^{z} e^{-x} \, dx \\
&= \Bigl[-x^z e^{-x}\Bigr]_0^\infty + \int_0^\infty z x^{z-1} e^{-x}\, dx \\
&= \lim_{x\to \infty}\left(-x^z e^{-x}\right) - \left(-0^z e^{-0}\right) + z\int_0^\infty x^{z-1} e^{-x}\, dx.
\end{aligned}
$$
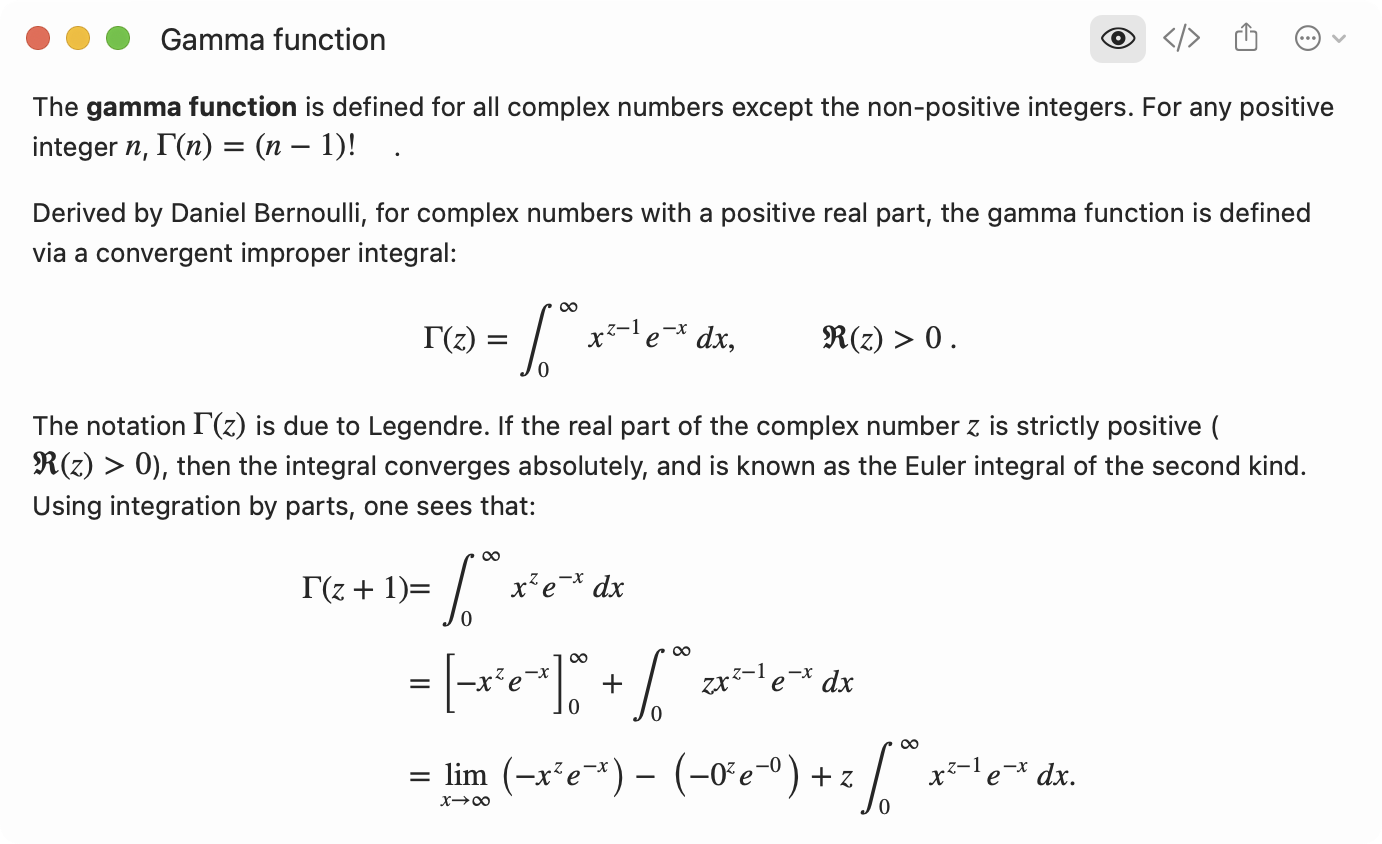
For more information about MathJax, consult the official documentation.
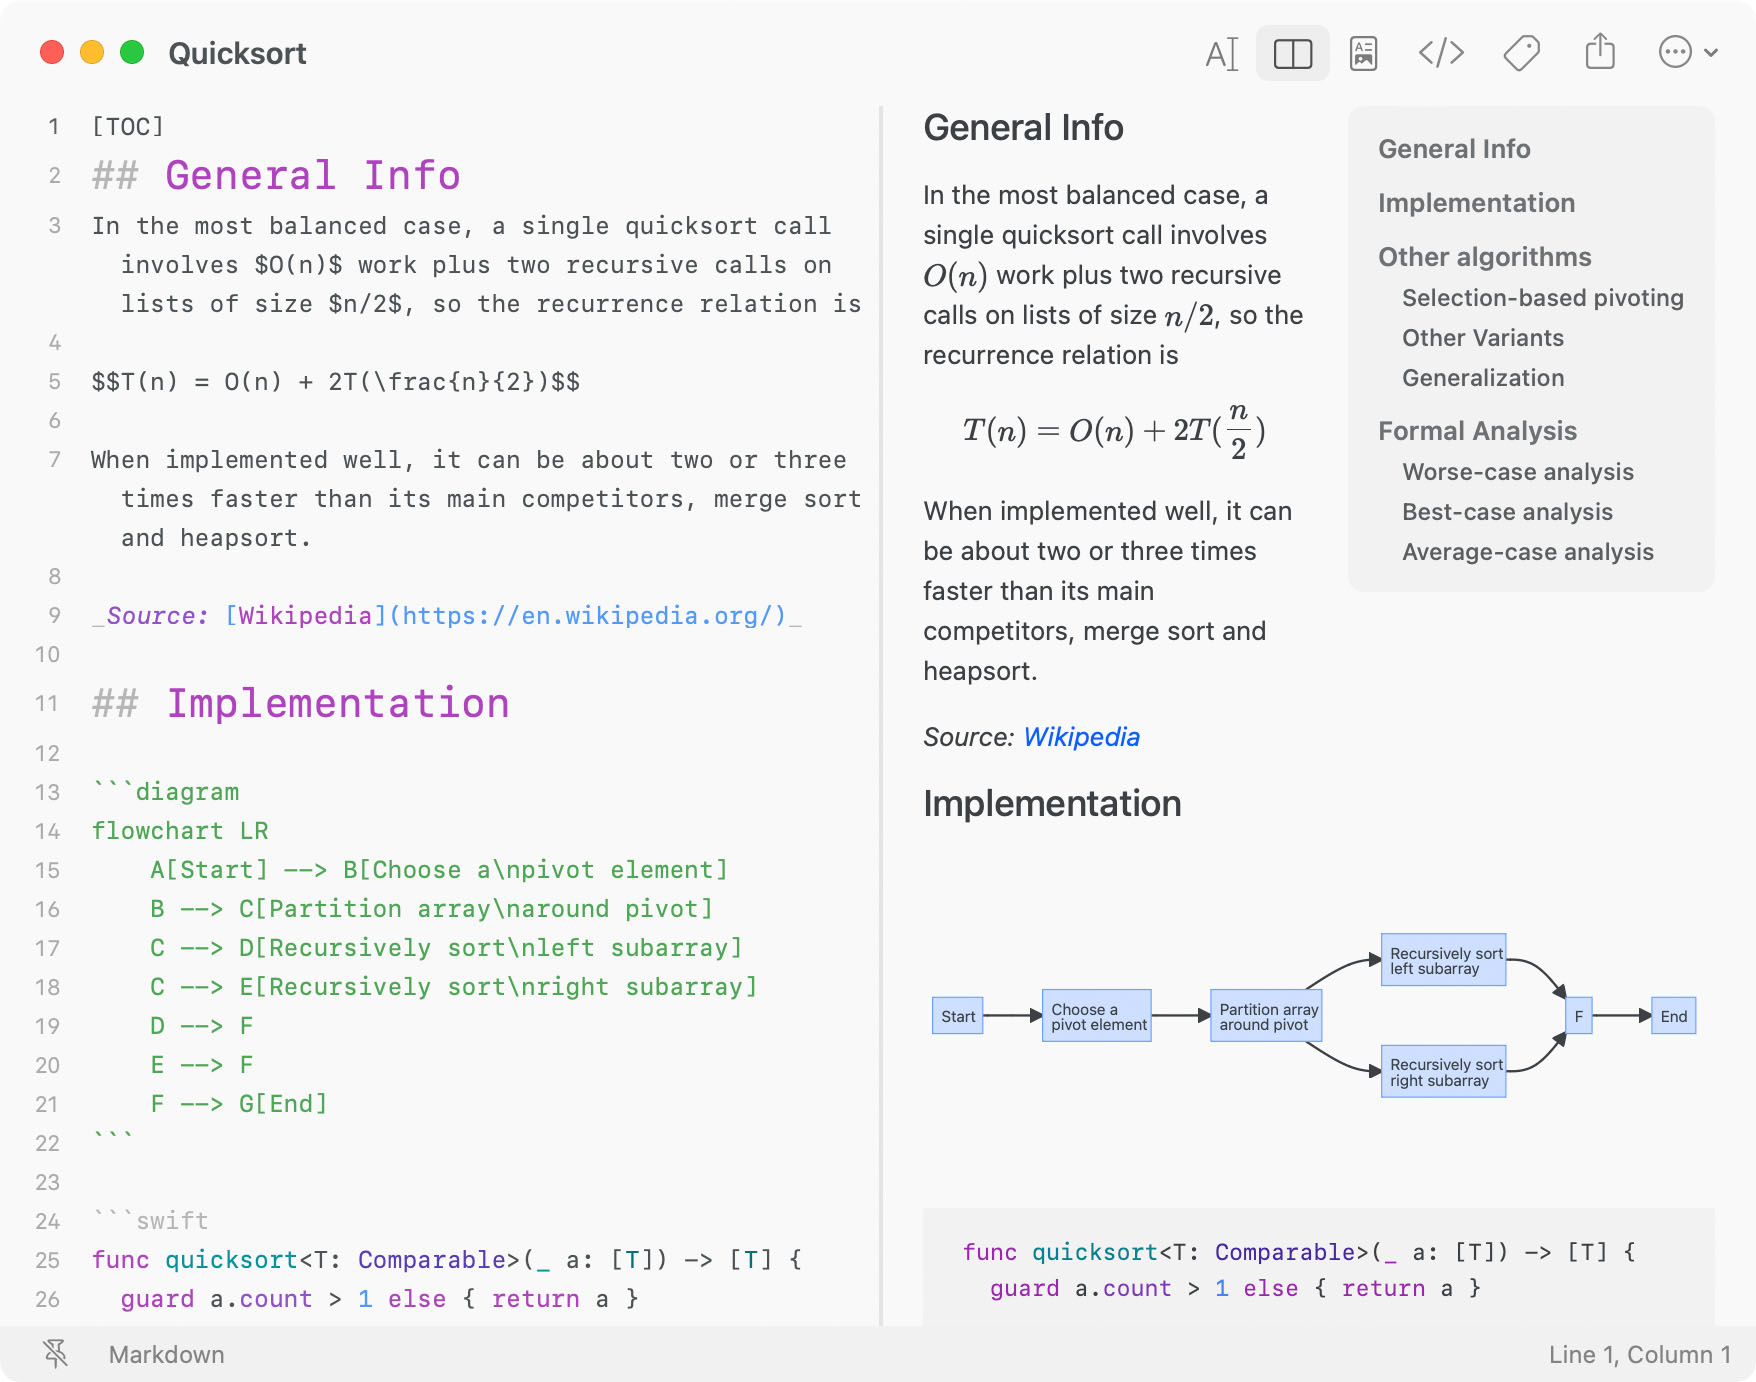
2.6. Diagrams
SnippetsLab has built-in support for Mermaid, a popular library for creating diagrams and visualizations with source code. Supported diagram types include:
Class diagram
Entity relationship diagram
Flowchart
Gantt chart
Pie chart
Requirement diagram
Sequence diagram
State diagram
Quadrant diagram
Mind map
Timeline diagram
Sankey diagram
XY chart
Block diagram
To insert a diagram, surround the diagram code with either the ```mermaid or ```diagram marker. You can also choose Format > Diagram from the menu bar to insert the required boilerplate quickly.
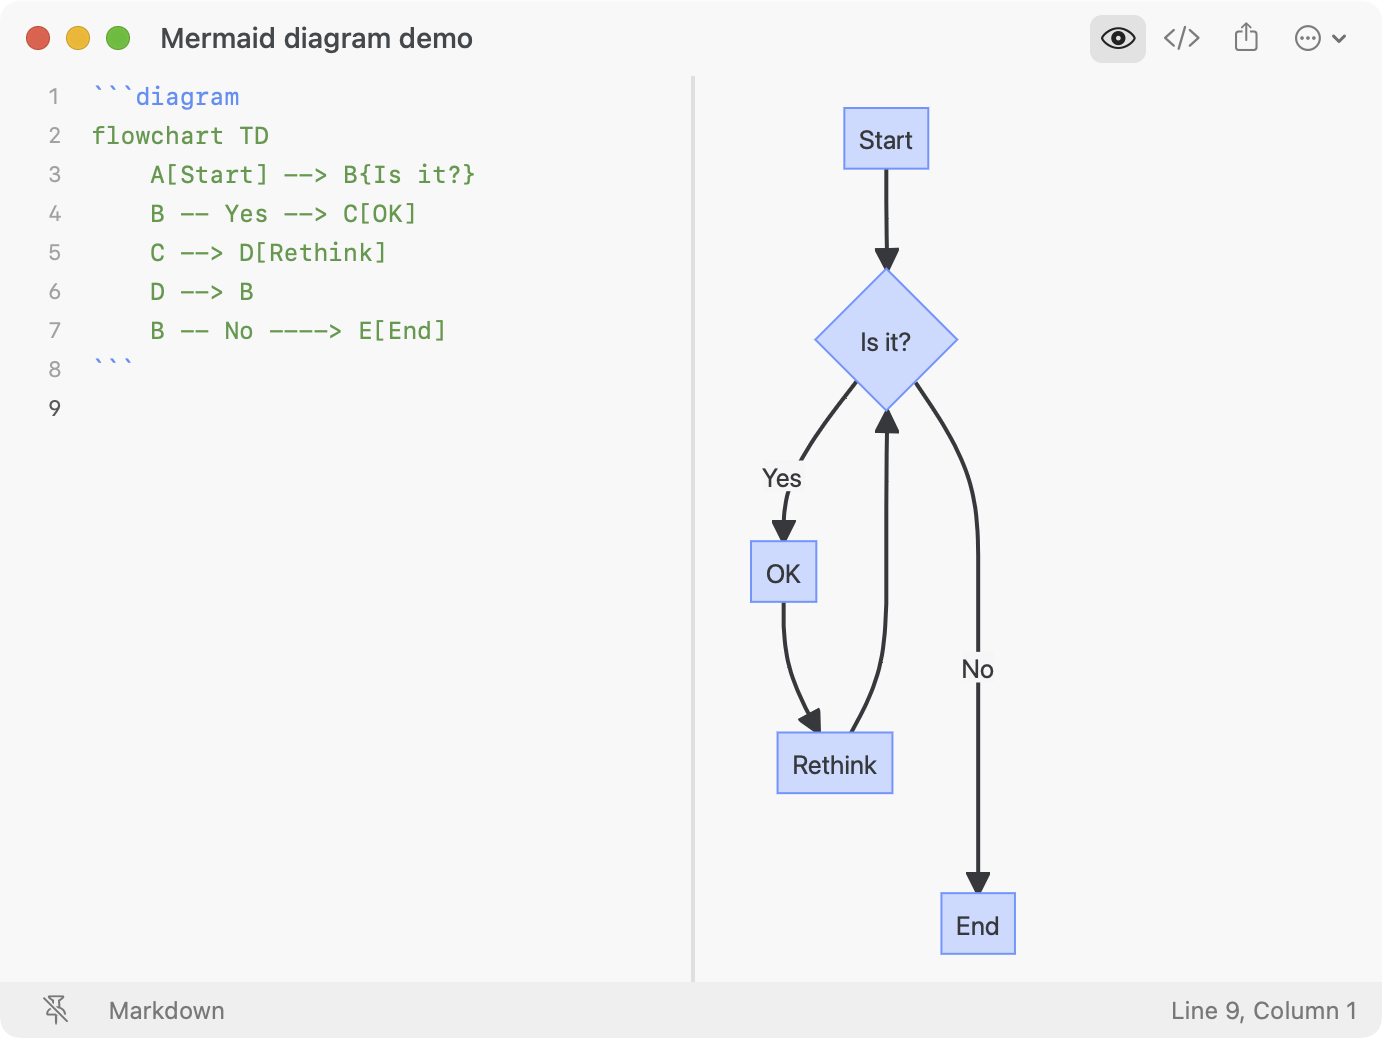
Refer to the official Mermaid documentation for more information on the syntax for each diagram type.
2.7. Preview Themes
Customize the preview CSS theme in Settings > Markdown > Theme.
Markdown themes are designed to integrate with the app’s main theme for a cohesive experience. For example, the main theme’s background color, accent color, and syntax highlighting color styles will be added automatically by SnippetsLab.
Tip
When customizing the CSS, right-click on Markdown preview and select Inspect Element to discover the document structure and necessary CSS selectors.